
I. Set up auto-enrollment in the web portal
- Sign in to the VitalLink Web Portal and go to Protocol Settings.
- Create a new protocol or select an existing protocol to edit.
- Under Enrollment Settings, select one of the following options:
- Auto: Automatically enroll all residents in the protocol.
- Manual: Require staff to assign the protocol to residents individually.
- Click Save
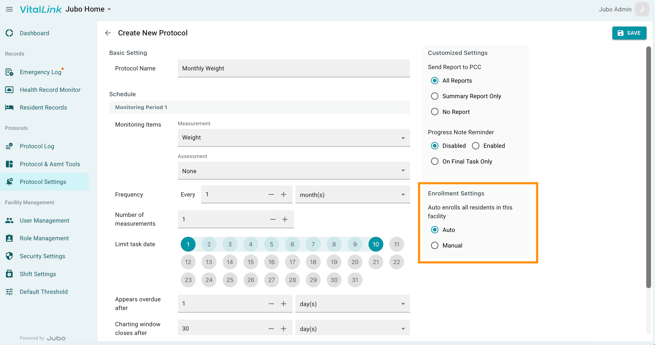
New protocols are set to Manual by default. Changing an existing protocol from Manual to Auto will automatically enroll residents who are not currently assigned to it, without affecting existing assignments. This adjustment does not require making an additional copy of the existing protocols.
Review Residents Not Enrolled
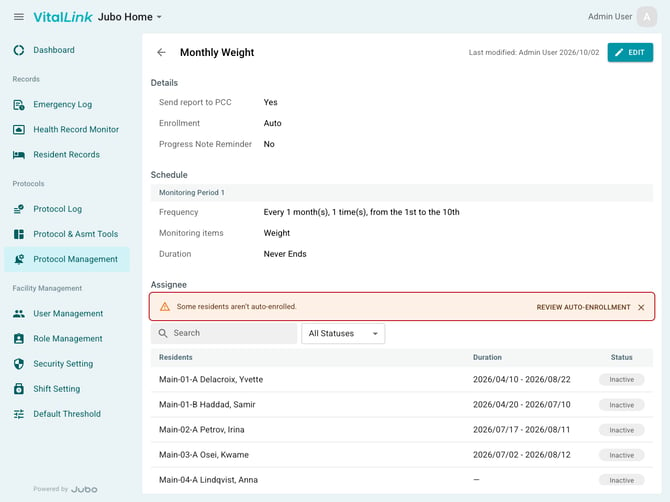
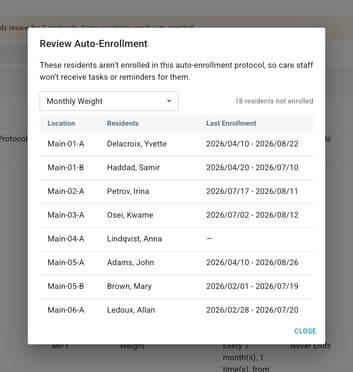
For Auto protocols, the Web Portal displays a notification when eligible residents are not enrolled. Click REVIEW AUTO-ENROLLMENT in Protocol Settings to view these residents and their most recent enrollment periods. This list helps administrators identify residents who may need follow-up, including those whose protocols were previously deactivated.
II. Configure permissions for deactivating auto-enrollment protocols
Administrators can control which user roles are allowed to manually deactivate auto-enrollment protocols. By default, the Admin role has permission to deactivate both auto and manual protocols.
- In the VitalLink Web Portal, go to Role Management.
- Select a role to start editing its permission.
- Under App, ensure Assign Protocol is enabled.
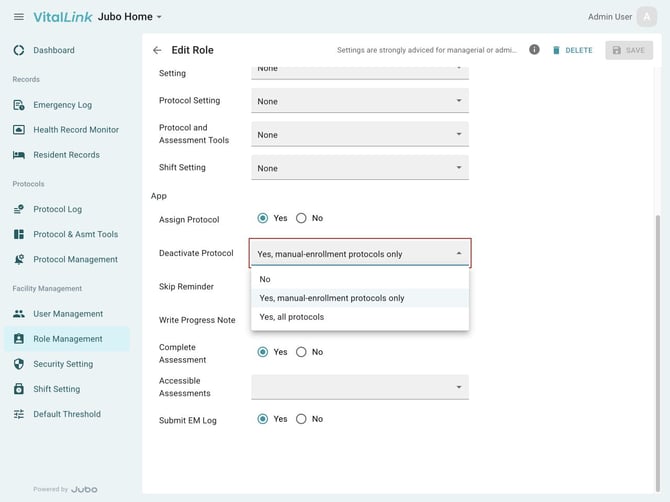
- Configure Deactivate Protocol using one of the following options:
- No: Users cannot deactivate protocols.
- Yes, manual-enrollment protocols only: Users can deactivate manual protocols only.
- Yes, all protocols: Users can deactivate both manual and auto-enrollment protocols.
- Click Save to apply the permissions.
Once a protocol is set to Auto, VitalLink automatically enrolls eligible residents based on their current status.
|
Scenario |
Auto-Enrollment Behavior |
|
Auto-Enrollment is enabled
|
Enrolls all residents currently in the facility who are not already enrolled |
|
New admission or readmission |
Automatically enrolls the resident when their status becomes Current on PCC
|
|
Resident is on leave or hospitalized |
Does not start a new enrollment until the resident returns
|
|
Resident returns from leave or hospitalization |
Enrolls the resident in eligible protocols not already active, unless previously manually deactivated
|
|
Protocol is manually deactivated for a resident |
Does not automatically restart for that resident through routine enrollment or renewal
|
|
Auto is changed to Manual |
Stops future automatic enrollment and renewal; existing assignments remain unchanged |
Notes:
1. Recurring protocols: Protocols set to Never Ends continue without restarting. Auto protocols with a defined duration automatically start a new enrollment period when the previous one ends.2. Manual deactivation: Staff with the appropriate permissions can deactivate an Auto protocol for an individual resident. The resident will not be automatically re-enrolled through routine events. However, changing a protocol from Manual to Auto will enroll all eligible residents not currently enrolled, including those previously manually deactivated.
3. Retired protocols: Retiring a protocol prevents new enrollments and automatic renewals. Users will need to manually deactivate the auto-enrollments protocols that are set as Never End from the app to complete the deactivation process.